
Start of a new Burner Design
Posted: November 3, 2014 Filed under: Burner, Homemade Boiler | Tags: Arduino boiler control, boiler, Burn test, burner, homemade chip boiler 1 Comment A friend with Solidworks has offered to draw up a new burner, so I thought I would post a few pictures of the old burner to help with dimensions. Here’s a picture of the uncleaned burner with about two inches of ash build up in the bottom of the burner.
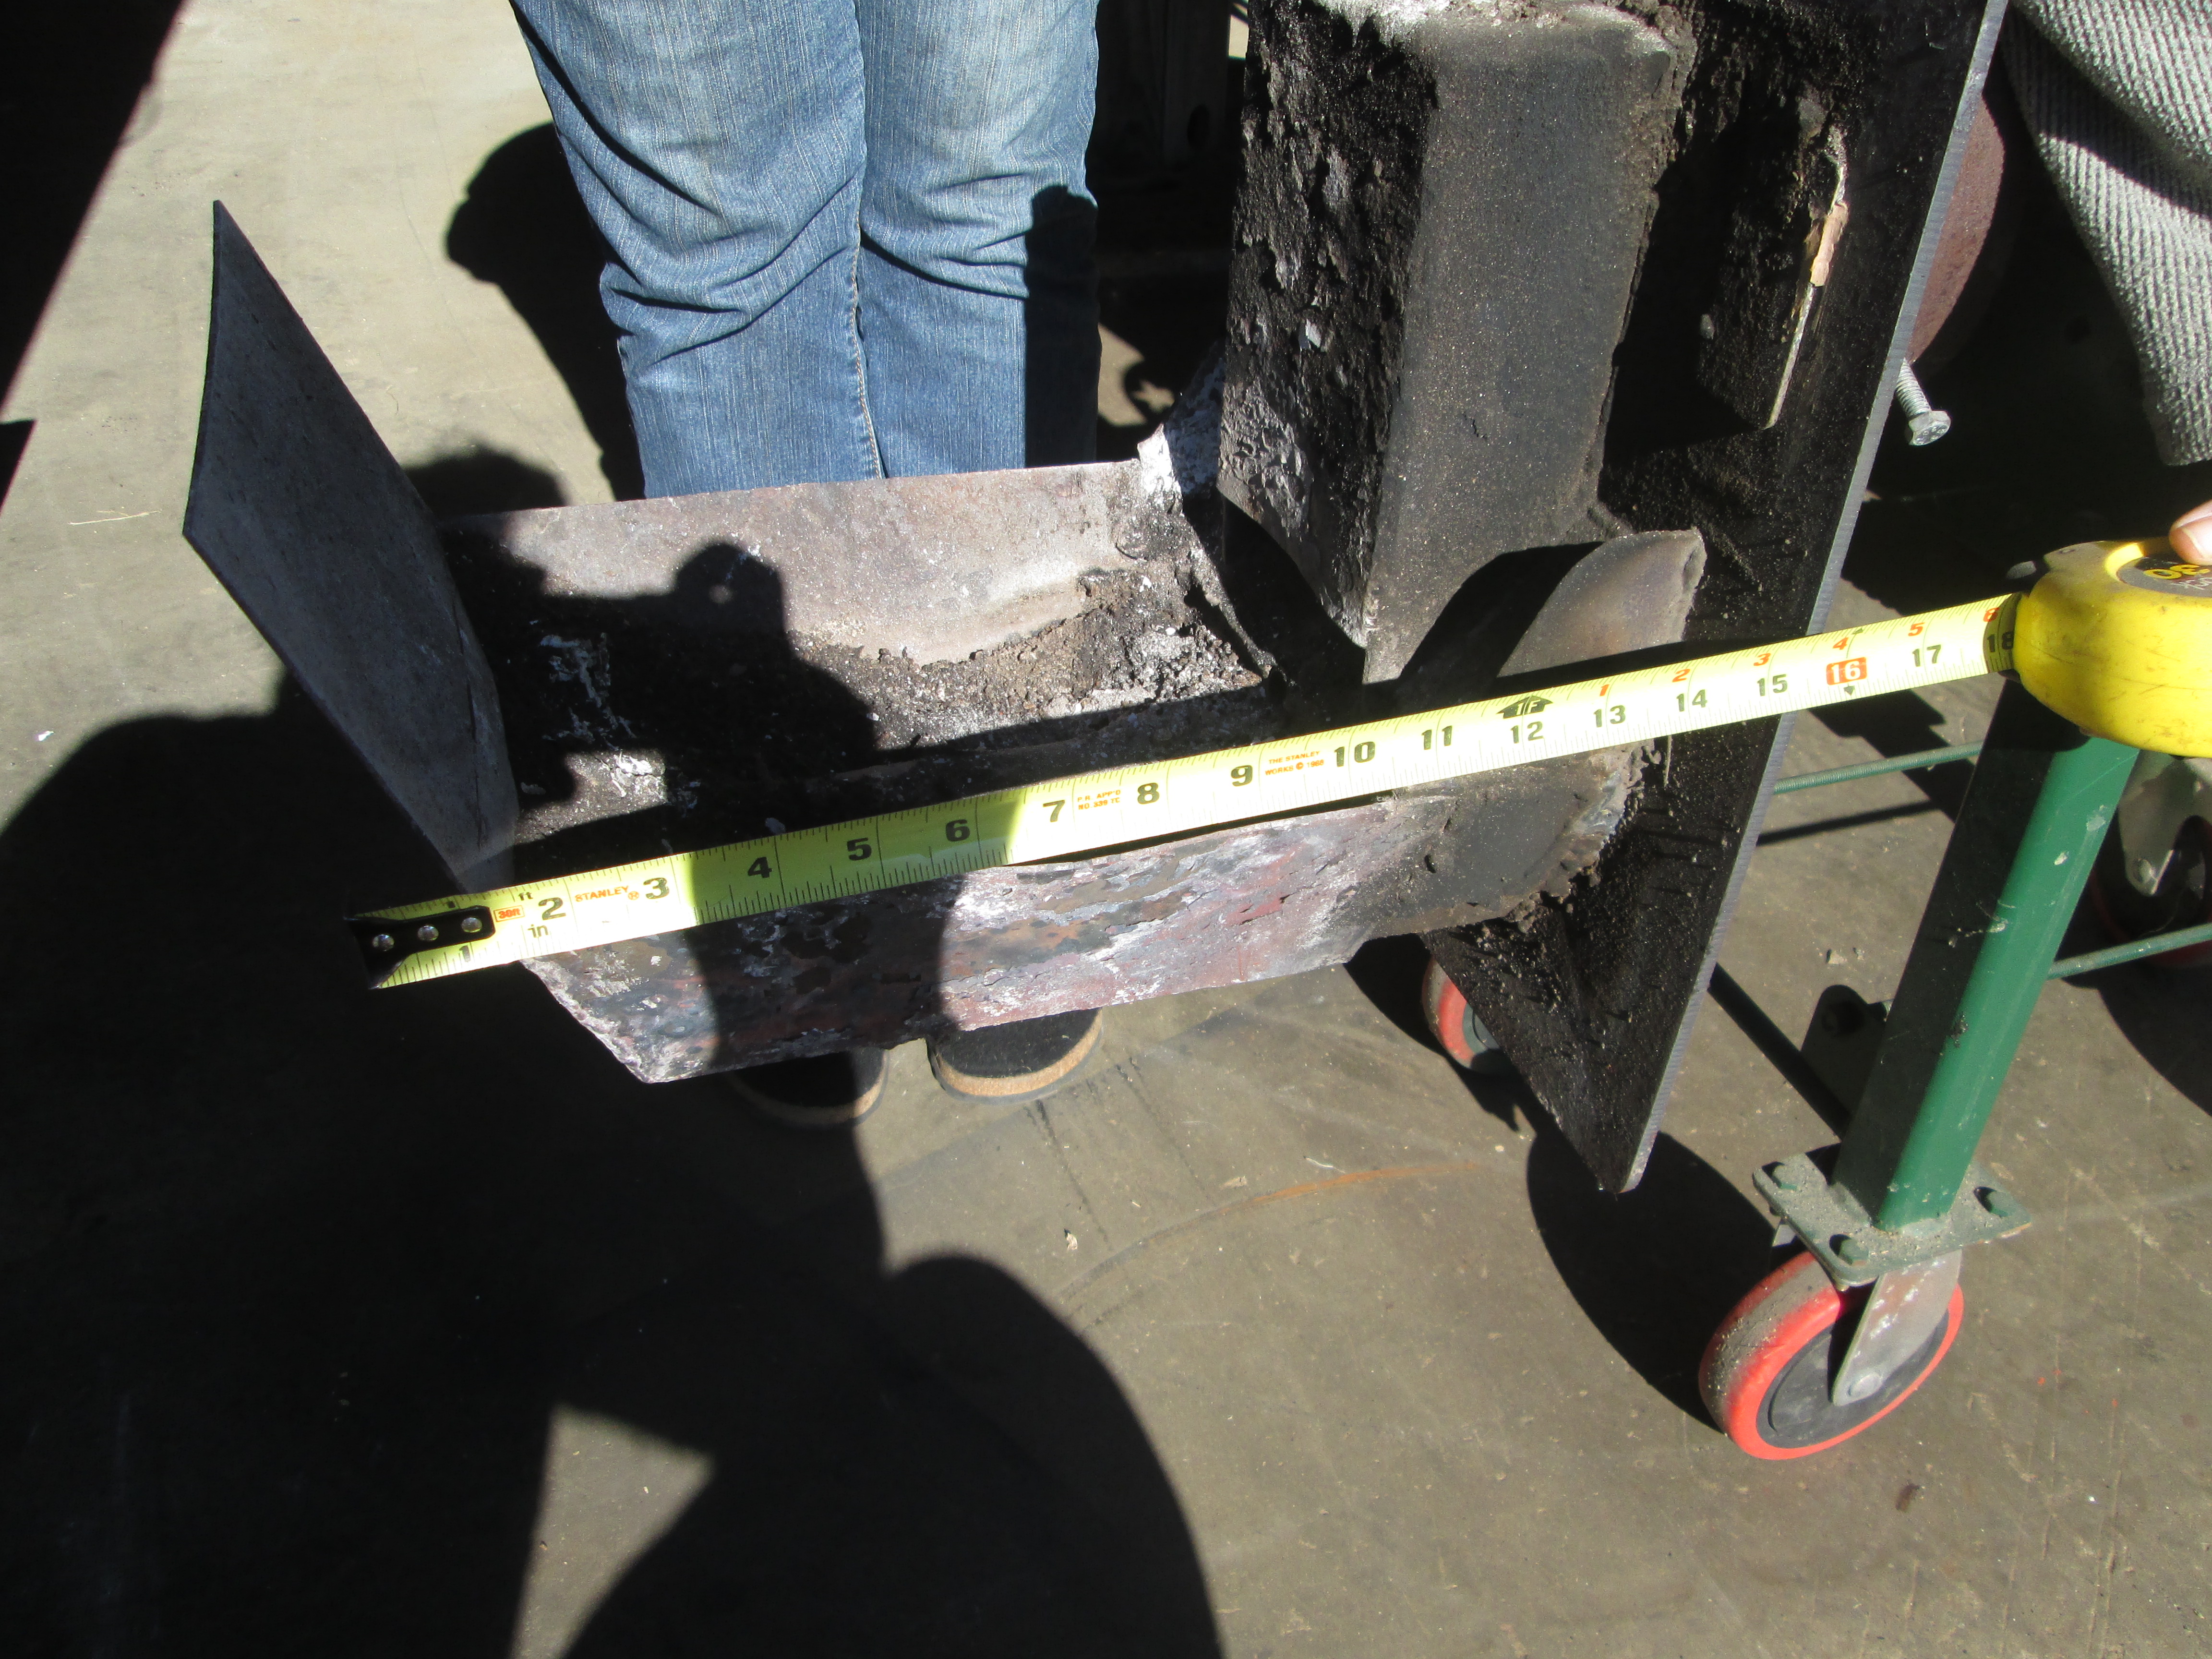
Side view uncleaned burner with tape
The tape measure in this view gives a little help with size. Originally the back flap was designed to help with air flow a sort of chimney effect, however this was of limited help and probably helped trap ash as do the high sides.

Top view showing hole size
The larger holes are 1/2″ and the ash still doesn’t fall through unless stirred.
HDD vs. Pellets Update
Posted: January 14, 2014 Filed under: Arduino, Homemade Boiler, Testing | Tags: Arduino boiler control, homemade chip boiler Leave a commentIt’s been a cold ride here in New Hampshire for a few weeks. However, like a campfire, on average we may end up less than average on HDD’s for the month. I say like a campfire, because it always seems that one side is too hot and one too cold to really enjoy it, however on average….It’s raining hard here today, so once again the snow is leaving. This will ruin the skiing and winter sports and yet it’s really too cold to enjoy summer sports. Winter in Northern New England has become a lot like southern New England. But that’s a different topic.

The pellets seem to be a pretty steady 14HDD per bag. And so a ton this time of year lasts about two weeks, maybe a little longer. We bought our first ton this year, I was using up old stock and we bought a ton from Tractor Supply, their brand. I am liking them a lot, they seem to not cause any ash build up problems at all. I will buy them again. If you add up all the bags used and divide by 50 bags/ton we are at 4.22 tons heating season to date, for a total cost of $947.39 at the cost of $224.50/ton.
HDD’s vs. Pellets Part 3
Posted: December 17, 2013 Filed under: Homemade Boiler | Tags: Arduino boiler control, HDD, HDD vs. Pellets, Heating Degree Days, homemade chip boiler Leave a commentThe HDD’s reported from Weather Underground was 324 for the week of December 8-14 and I used 24 bags of fuel, more than would have been calculated by a simple ratio based on last weeks fuel usage, however very close to the trend line of the original scatter plot which I will post again here. So as time goes on the prediction gets a bit better. 
It’s shaping up to be about 13.5 HDD’s per bag of pellets, I have made minor changes to the software so, I think these numbers are getting more stable as time goes on. Note that December 2012 for the first two weeks added up to 431 HDD compared to December 2013’s first two weeks 548 HDD.
HDD vs. Fuel Used
Posted: December 2, 2013 Filed under: Homemade Boiler, Testing | Tags: Cheap green heat, cheap heating, homemade chip boiler, pellets Leave a comment
Above is a scatter plot of Heating Degree Days (HDD) taken from Weather Underground data from the weather station in Springfield VT. Not exactly Newport, NH but close enough for this graph. It’s important to note that the beginning of October was quite nice which resulted in a fair number of days of timed burns, starting the boiler at 4 pm and running it until 9 pm for example. It quickly became obvious with Novembers below average weather that this would not result in satisfactory comfort and the boiler has been running continuously for most of the month. The trend-line looks like you would expect to see it, but the scatter data is quite varied. It will be interesting to see if this data correlates better as the winter continues.
The total pounds of fuel burned Heating season to date: 92 bags @40 pounds/bag= 3680 pounds vs. a total HDD to Date of 1444. Last year’s data for December indicates a HDD total for the month of 1069. This should result in 68 bags burned for the month for a total of 2720 pounds. Using $215 per ton this should be a monthly cost of $292.40 This is both heat and hot water. Be interesting to see at the end of the month how close the prediction comes.
You may remember I added a function to collect HDD data at one point, however it never seemed to work as well as it should have so I stopped using it, I am now considering reviving a variation of that function using an array for the max and min hourly numbers to get a more accurate HDD local number. I’ll post the code when I finish.
Minor Software changes can make life much more convienient
Posted: October 15, 2013 Filed under: Arduino, Homemade Boiler | Tags: Arduino, Arduino boiler control, homemade chip boiler, Software Leave a comment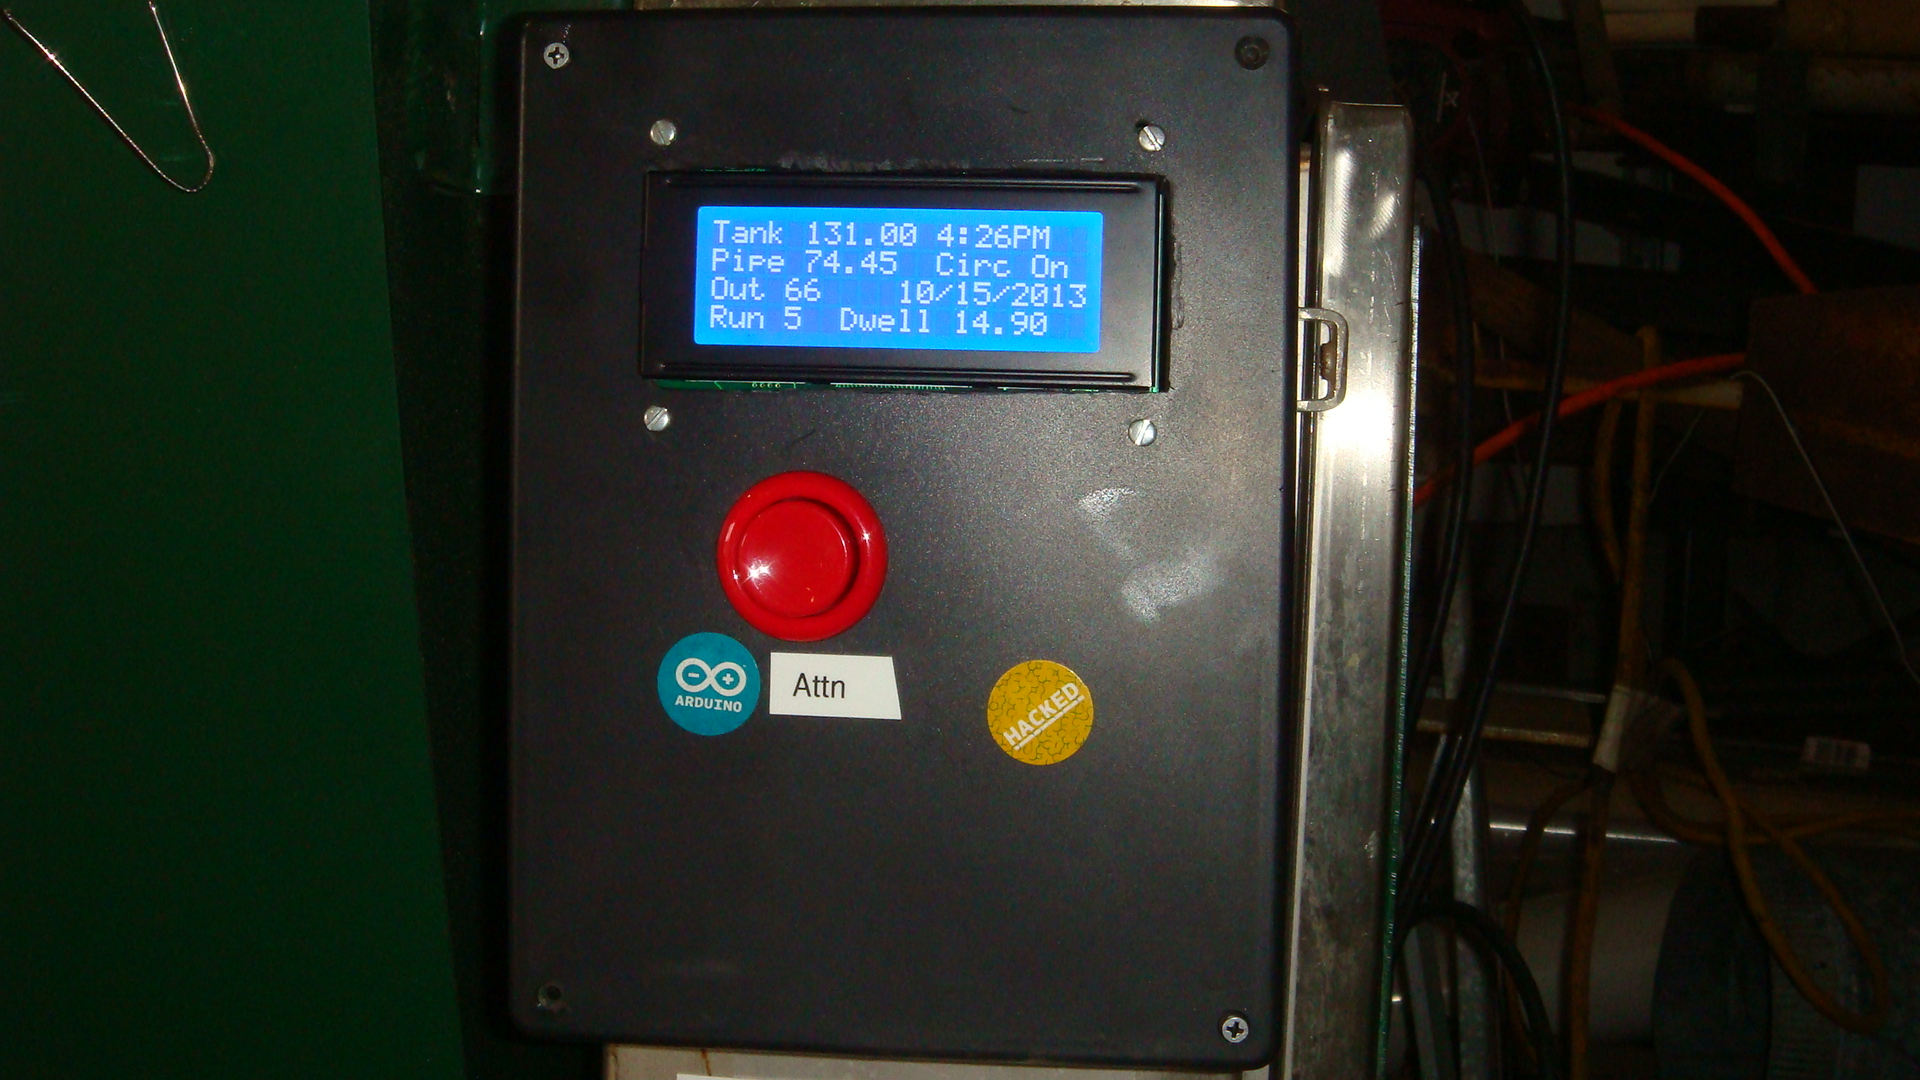 This time of year in New Hampshire it is warm days and cool nights. Pleasant for the most part but it is still fall. There can be some rainy raw days that need a touch of heat and to heat the hot water or maybe the day is warm enough but just cloudy so you want to heat the hot water for showers. So in other words the boiler can often run for 3-4 hours per night, maybe one or two evenings per week.
Shutting the unit down before the upgrade consisted of unplugging the unit which includes all the controls except the draft fan. This of course shuts off the feed and everything else but the fire still burns the remaining fuel. I keep the draft fan on to minimize any smoking that might occur otherwise. I live on the second floor of the building and the boiler is on the first floor so typically I would walk down unplug the unit, take a shower and then go back down and unplug the draft fan. More than once I have had to go down later after forgetting to unplug the draft fan. So I added a physical button, the Attn button, to the front of the control panel, and rewired the control box to relay control the draft fan. Now with a minor software change made I can go down hit the button and the unit shuts the auger feed immediately and then after twenty minutes turns off the relay for the draft fan. It’s so cool my girlfriend wants to go push the button. Can life get any better?
Summer’s almost over, time to start thinking about heat
Posted: August 21, 2013 Filed under: Arduino, Data logging, Homemade Boiler, Hopper and Feed, Plumbing the boiler, Testing | Tags: Arduino, CNC Plasma, homemade chip boiler, welding project Leave a comment
I know it’s early on the calendar but my focus is starting to shift back to my heating hobby. After two years of experimenting I have a proven performer with both the mechanical unit and the software I used last winter. I could change nothing and go through the winter fairly smoothly but there is always room for more improvement. So this is my plan: 1) Build a new unit very similar to the proven unit I have been using but with greater feed range capability to allow the unit to feed wood chips as well as pellets. By building a complete new unit I can always roll up the proven unit after the experiment is over and the data collected and resume heating without a hiccup. 2) Make slight modifications to the boiler to allow a larger interface plate between the feed unit and the boiler. This will allow a greater range of experimentation with burner designs. 3) Continue making small experimental changes to the working pellet unit such as a vibrator for ash removal, different burner designs, different draft designs. 4) Continue to make changes and improvements to the software. To start I would like three modes of operation. Continuous, run for some amount of time, and run until a set time. I changed the software to run to a set time by calendar date last spring but it was built into the software by date not menu or button choice. I would like to have the option of running for a few hours for both experimentation and also to occasionally heat hot water and be able to choose these options by menu. This fall I am sure I would like the unit to be able to take the chill off and then shut down. 5) Build a chip dryer. This is going to get to be a priority , I know the days are getting a little shorter and it is amazing how much less solar there is in the fall. Time to giddy up on that one.
I know I have to prioritize the work, and work as time and cash flow allows. But I think the first step will be to make a new interface plate and boiler opening. This will allow standardization for the next design and this work can be done while there is no particular need for heat. I went dumpster diving the other day and got a great new electrical box, so I guess I can get going on the that part of the new burner feed. I like free stuff. I may hit that dumpster again soon.
In the mean time it is still summer and there is still sailing weather.
Fire!
Posted: April 23, 2013 Filed under: Arduino, Data logging, MicroSD card, Testing | Tags: Arduino, Arduino boiler control, Cheap green heat, chip boiler, DIY, homemade chip boiler Leave a commentWell of course there’s fire in the burner that’s how it works. After today however the Arduino should be able to sense the fire since I added a photo resistor, commonly known as a flame sensor, bought at a furnace supply store. With the Arduino’s ability to sense flame, the addition of automatic self starting should be enabled. The ability to determine if fuel is building up should also add safety to an already proven safe unit.
The sensor I obtained is a flame sensor used in a normal oil or gas fired burner. The flame sensor allows me to sense the light corresponding to a fire currently burning. The sensor cannot determine if the fire went out or if the flame sensor can no longer see it but functionally it makes no difference to me. I am interested in either condition and the response is the same to both conditions, turn off the fuel feed. If the fire went out, no need to keep feeding fuel, that will simply clog the feed chute and make a mess. If the fuel has backed up the feed chute so much as to shield the flame sensor, there is excess fuel, turn off the fuel feed. Physically the sensor is mounted to “look” through the back of the feed slide. This positions was chosen purposefully to determine if fuel was backing up.
Because the flame sensor is a resistor, I am using a voltage divider circuit to measure the voltage and then using the software to check the voltage with a if – then statement. The software determines if the voltage is high enough to indicate flame or too low indicating dark. I have been recording various sensor data to the micro SD over the heating season, so I will record the voltage overnight and we can see the range of data tomorrow. If anything this should be a good time of year for the test since the fire is needed to maintain the temperature in the building, it is mid 30’s F here today, but the fire is not required to be too vigorous since the temperature is not extremely cold.
Pictures and data to follow.
All is well here in NH
Posted: January 24, 2013 Filed under: Homemade Boiler, Testing | Tags: Arduino, cheap heat, cheap heating, HDD, Heating Degree Days Leave a commentI went out on a customer issue the other day, I had to meet a locksmith at a customer’s house. After the job was done the locksmith who I have done business with for years and is a friend came back to the shop for a check and a beer. Naturally I showed him my home built boiler. He rent’s so he wasn’t particularly interested but mentioned he buys a 5 gallon can of off road diesel to bring home to heat his house every day. The price is about $3.77 per gallon which is about what the local oil company would charge to deliver. So if it’s the same price why not have it delivered? Because he doesn’t want to, or can’t tie up the $471.25 the fuel company would want for a minimum sale. That amount of fuel would last him about 25 days at his 5 gallon a day rate, maybe less time if the 10 gallon nights are accounted in as well. Since it was quite cold he was planning on buying two cans that night. He said the normal 5 gallons cost him $19/day. Rounding this to $20 for ease of math and multiplying by 30 days per month this is approx. $600 per month for fuel oil. We bought our third ton of of pellets for the heating season for $209 at Tractor supply last week. So our total fuel costs for the year are approx. $800 from November to mid February. What a difference! Not to mention I can’t imagine going to the gas station every day for fuel. What a pain. Having diesel trucks and fueling up at the same pumps I see many different people filling five gallon cans every time I fuel my trucks. I’m not the best at budgeting in the world, but I realize my blessings when I witness first hand how the paycheck to paycheck underemployed crowd deals with winter.
I’ve started calculating the Heating degree days with the Arduino program. It’s a pretty accurate look at the day’s heating requirements. I want to correlate those temperatures to fuel usage. I also have updated the CNC plasma cutter to the 5 start lead screw. Before I made the upgrades I needed to limit the cutter to a linear travel rate of 13 inches per minute to avoid vibration issues. After reassembly I tested the machine to 40 inches per minute with no problems. It may be even better than that I just got so giddy I quit testing. I am hoping this will significantly reduce the slag produced by the plasma cut. Not much motivation to take anything apart at this point. It’s just too damn cold out. It was -5°F this morning here, the HDD days yesterday was 65.5. Stay warm out there. I could back the tractor out of the shop and do some woodworking, maybe build the chip dryer…..
Mid January cabin fever and progress report
Posted: January 18, 2013 Filed under: Homemade Boiler, Testing | Tags: Arduino, for sale, for sale DIY boiler, homebuilt boiler, homemade chip boiler, welding project Leave a commentIt may not be cabin fever, more just a general malaise. That midwinter everything is working and I don’t want to take it apart feeling. But I have several projects half done at this point. I am waiting for headers to install the Ethernet card so the Ethernet update project is on hold. The CNC plasma cutter is apart awaiting a new lead screw for the y-axis. This is to remove the vibration issues I have been experiencing. I am changing from a single start to a five start lead screw. I will lose one fifth of the resolution I have presently but that will still be plenty of resolution for this application. But the big news is I am finally going to move on building a new firebox. It’s time to retire the over the road fuel tank turned boiler. Well maybe not retire, just move onto a new home. Anyone want to buy this working boiler? I would consider selling the auger and burner feed as well as a combination. The unit is located in Newport, NH if you would like to see it working. It won’t be available until it’s replacement is built. It is after all heating the house, shop and hot water. But I am hoping to have the replacement built before the end of the heating season for some testing. If you are interested drop me an email at: clarkcontr@gmail.com
A quick reminder of what the combination looks like, this has successfully burned pellets, chips and to a limited degree sawdust. Ideally you would be a person who can tinker as this is a prototype unit.
The software, Arduino and LCD display all very solid and work very well.

I am considering adding Ethernet capability
Posted: January 14, 2013 Filed under: Arduino, Ethernet, Testing | Tags: Arduino, Arduino boiler control, data logger, Ethernet Leave a commentBy adding Ethernet capability I can write the data I am currently collecting on the micro SD card to a browser directly. This means I could pull up Firefox and go to my Arduino’s IP Address and see the data. This will give me the ability to read the data from anywhere on my home network as well as anywhere I can get internet connectivity, potentially allowing me to review data from a smart phone remotely. Additionally I could control relays from a remote location as well. But for now the ability to ease the data collection and monitor the process remotely will be a great first step. First I have to buy an Ethernet shield. For those of you not familiar with Arduino this means an additional plug-in board that will stack on top of the Arduino pins.

Ethernet Shield
Here’s a picture of just the Ethernet shield, the connection point you see on the front is the plug-in point for the Ethernet connection. This is a RJ-45 connector. I was able to get a 100 foot Cat 5 with installed RJ-45 connectors for $27 at Home Depot.

Ethernet Shield stacked on an Arduino UNO, note upper connection is the RJ-45 Ethernet connection
At present I have already have a prototype shield plugged into my Arduino Uno. This allows me to easily disconnect and update the Uno without disturbing any wiring connections. There are quite a few wiring connections for the RTC or Real Time Clock, the LCD display, the outside temperature thermister, the boiler water tank thermister, the Auger Feed pipe thermister as well as Relays to turn on the Auger motor and boiler tank water circulator. But when I attempted to plug in a prototype shield into the Ethernet shield there was interference with the RJ-45 connection point. The prototype shield would have grounded itself on the metal so I have ordered Stacking headers to extend the height above the shield. More when the headers arrive.
